
This section has been UPDATED:
Water is one of those necessary evils of backpacking. We can’t hike without it, but dang it weights a lot. In fact one liter of water weighs 2.2 pounds, a serious addition to your pack weight. If only dehydrated water was an option 🙂
There are two primary considerations when it comes to water: Vessel & Treatment
Vessel:
Once again, personal choice and hiking conditions will factor into this decision. Most likely you will use whatever you currently use on long day hikes. My current system is outlined at the bottom of this page.
(1) HYDRATION BLADDER – I’m a fan of the bladder/hose system as I find it more convenient for drinking regularly. The negatives are that it is more difficult to monitor depletion and possibly to refill. I’ve dealt with both of these issues, first, by carrying a full water bottle as a secondary source in case I run dry unexpectedly, and second, by packing my bladder horizontally at the top of my pack rather than vertically so that I can refill easily and monitor water level. Other considerations:
- CAPACITY – Bladders are sized 1 liter up to 6 liters. I’ve been quite happy with my 4 liter size. If you are having to carry long distances or many hours between refill locations, you may need larger or secondary sources.
- ACCESS – There are several options, large mouth containers, zip-top closures, etc. I prefer a large mouth (easy to fill and clean) with an easily exchangeable hose (as I like option of using inline filter)
- MOUTH PIECE & HOSE SIZE – I prefer a mouthpiece that has a shut-off valve so I don’t lose my precious water. I use an inline filter so it’s important that my hose size matches the filter intake valve.
- ACCESSORIES – I tend to do a lot of hiking in either HOT or COLD temperatures, thus I like having a insulated hose cover, a bit more weight but worth it. I also like my hydration bladder to have a way to hang it so I can use it as a gravity filter bag in camp. More on this later.
(2) BOTTLES – Nalgene bottles are probably the most popular, followed closely by Gatorade and Smart Water bottles. Just keep in mind weight, capacity and opening size.
(3) COLLAPSIBLE BAGS – These have become extremely popular over the past couple of years as a way to store additional water when needed for long dry stretches. Keep in mind the opening size, they seem to have quite a small mouth, thus making filling from some water sources challenging. Examples: Sawyer, Evernew
, Platypus
Water Treatment:
There are five primary categories of water treatment. With plenty of opinions and choices, your choice may be somewhat dependent upon your water source and somewhat upon your concerns about water-borne illnesses such as Giardia, E. coli and Cryptosporidium.
(1) FILTER – The most popular types of filtered treatment are pump and hollow-fiber membrane. You will want to compare the specs on filters to ensure you are receiving the protection expected. In my opinion, Sawyer is at the forefront and in my opinion their specs should be used as a measurement standard.
- PUMP MECHANISM – This method was the first in modern treatment. It is labor intensive, but one of the benefits is that it can be used in very small pools of water, where filling containers for other treatment may be a problem. While pumps tend to need more cleaning and maintenance than other options, the positive is that they can be taken apart easily for infield repair and maintenance.
- HOLLOW-FIBER MEMBRANE MECHANISM – This type of filter have become very popular over the past few years, primarily because of weight, size, reliability, flexibility and ease of use. Initially the cost was about the same as pumps, but cost is continuing to decrease. In fact, Sawyer just released their Mini 2 oz, 0.1 micron filter that fits in the palm for your hand, with a 100,000 gallon guarantee, for around $25. If you are considering buying or replacing your pump, my recommendation is the Sawyer Mini. The price, size and guarantee is unbeatable.

The flexibility of hollow-fiber technology is that these filters can be used several ways:
- Squeeze Method – Sawyer invented this technology and it has revolutionized filtering. A “dirty bag” is filled with water from the source. The dirty bag is connected to the filter which is connected to your clean vessel. The water in the dirty bag is squeezed through the filter. Sawyer Squeeze
- Gravity Method – I believe MSR or Platypus were the first to create this method. A “dirty bag” is filled with water from the source. The dirty bag is hung from a tree or elevated on a rock or log, the filter is attached between two sections of hose and your clean vessel is quickly filled with no effort on your behalf. I LOVE this system and started using it with a MSR filter a couple of years ago and switched to a Sawyer 3-way filter last year due to weight and size benefits; however now that the squeeze has been perfected, I plan to discontinue using this system.
- In-Line Method – With this method, your hydration reservoir becomes the “dirty bag.” It is filled with water from the dirty source, the filter is spliced in your drinking hose. I use this method as I find it a very efficient way to filter on demand. The flow through the hose may not be quite as efficient as without the filter, but I have not had any concerns. Most companies sell an adapter kit, if not, it is fairly simple to create your own, and with the new Sawyer Mini, an adapter is no longer needed.
(2) CHEMICAL – Many hikers choose this method due to cost, weight and simplicity; however, there are trade-offs. If you are interested in this option, I encourage you to do some research, especially regarding time to treat, process to treat, and what waterborne illnesses you may not be treating. The main categories of chemical treatment are:
- Bleach – CDC guidelines
- Iodine Tablets – Example: Potable Aqua
-
Chlorine-Dioxide Drops – Example: Aquamira
(3) ULTRAVIOLET – A few years ago the SteriPen was invented, and just like chemical treatment it has issues to be researched.
(4) BOILING – This is really not an option for backpackers unless you plan to always have a campfire. The amount of fuel required to boil water for sufficient time offsets the benefits of not carrying a filter. CDC Guidelines
(5) NO TREATMENT – There are plenty of hikers who have not gotten sick from drinking untreated water. Decide for yourself if the risk is worth it.

Jan’s Tips:
My current system is about 7oz for 3 one-liter bags, the filter, hoses, a hose insulator and adapter. I’m using the Sawyer 32oz Pouch as my dirty vessel inline with my Sawyer Mini filter. I recommend flexible silicone tubing (1/4″ inside dimension ID, 3/8″ outside dimension OD, 1/16″ wall). See below for Jan’s method of back flushing the filter.

Sawyer Mini Filter used inline with a 1L bag. Now my water is easily accessible and refillable on the outside of my pack.
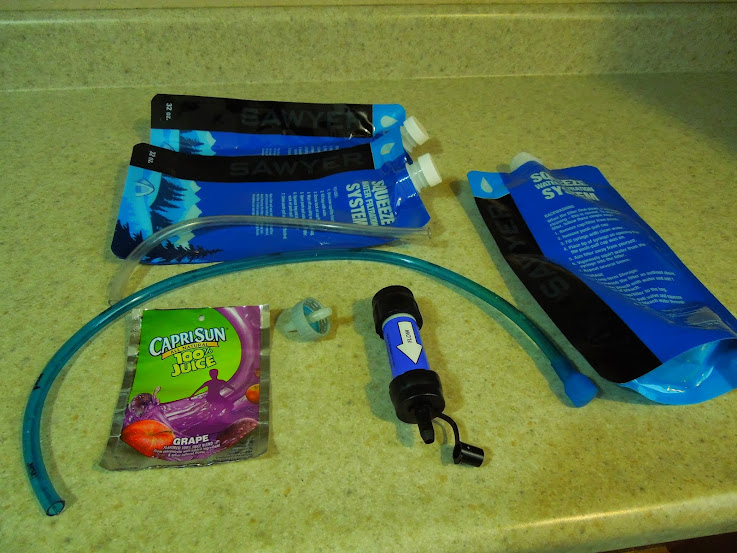
I pack three 1L bags so I have flexibility on the amount of water I carry between water sources. I connect the clear hose to the bottom of the filter (slightly longer than the bag). I connect the blue drinking hose to the top of the filter. The Capri Sun flask is used to fill the bottles when water sources limit the small opening of the bottle. The straw provided by Sawyer is not long enough for the 1L bags. The lid adapter will be explained in the next photo. The hose insulator is not pictured.

When I want to drink directly from the bag (i.e. when starting a trip) and I don’t want to drink through the filter, I connect the hoses to this adapter. I used a soda bottle cap, drilled a hole in the middle, inserted this 1/4″ dual barbed connector and then added a little superglue to fill any openings around the connector. Weighs 3 grams.
I found it difficult to “vigorously” back flush the Mini. I felt as if a third hand might be helpful, plus it was frustrating to flush in the field since we should be using filtered water as our flushing source. My solution: (1) Attach a a small section of clean flexible tubing between the nozzle of the syringe and the drinking end of the Mini; (2) place the dirty end of the Mini into your water source (creek, lake, ziplock, cup or at home a sink, cup or bowl with a little clorox); (3) pull the plunger to draw up water through the filter and hose filling the syringe; (4) push the plunger vigorously flushing water through the hose and filter; and (5) repeat the push/pull action several times. If the filter still seems a bit slow, pull up water into the syringe, then gently bang filter a few times to dislodge particulates before pushing water again. I’ve found this method much more effective than the one outlined by Sawyer; quick and easy without a mess. Try it, I bet you’ll like it also.

Here’s an even better solution for backflushing. Just remember, you need to use clean water as your source. Since my bags are “dirty,” I’ll be using Aquamarina or clorox to treat my water and dirty bag prior to flushing. I love the idea of something as small as a Smart water bottle cap which can also be used on a bottle. I also like the more consistent pressure I’m able to apply (beware of too much PSI).
Reviews:
- Sawyer Mini vs Squeeze by Wired
- Sawyer Mini vs Squeeze by Guthook
- Sawyer Mini by Lady on a Rock
- Sawyer Mini by Keith Foskett

WOW…great writing Jan…that was so imformative…I feel as if I just watched a documentary…:-).
Ah thanks and you are welcome